Lesson Plan Title : Positive and Negative Space
Age Range: Grade 6 through grade 8
Overview and Purpose: Students will create pictures using white and black construction paper to illustrate the use of positive and negative space in art.
Objective: The student will be able to illustrate positive and negative space by making a picture containing at least three objects.
Resources:
Black and white construction paper (the white piece should be half the size of the black one)
Pencils
Scissors
Background:
Positive space can best be described as the subject portion of the work of art. The negative space is everything or better described as the areas around the subject. Depending on your perspective there are many situations where you may disagree with others, especially the artist, of the locations of these spaces.
These concepts have a great deal of influence on how the composition of a work of art is perceived by the audience. When we are creating our own pieces having a good command of these concepts can be very beneficial for designing well received pieces.
Activities:
Discuss positive and negative space with students. Explain that positive space is the area taken up by objects in the picture and negative space is the area around and under an object. If the object is removed, the resulting blank area is negative space.
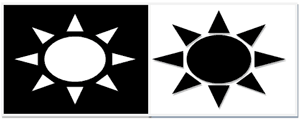
Give each student a piece of black and a piece of white construction paper. Explain that they are going to create a picture where one side shows positive space, and the other side shows negative space. Have the students draw and cut out a large object on the piece of white paper. Have them cut pieces out of the object. On one half of the black paper the students should lay the white piece of paper and any shapes they cut out of the object. On the other half, they should place the object so that it mirrors the blank space on the other half.
Here is an example of using the sun as an example. In the first example (left) the white color indicates the positive space and the black color the negative space. In the example to the right, as you can see, these perspectives are flipped.

Extensions For Your Classroom:
When you are short on supplies consider using a computer. If your students have access to PowerPoint or even a simple Paint program, you can have them create very simple designs. When they are done, they can label these portions of the composition. This makes for a 10-15-minute activity that is great to end a class with or even start a lesson.
Wrap Up:
More advanced students may wish to choose more complex designs or contrasting colors. You can also challenge students to create a self-portrait using negative space.